20
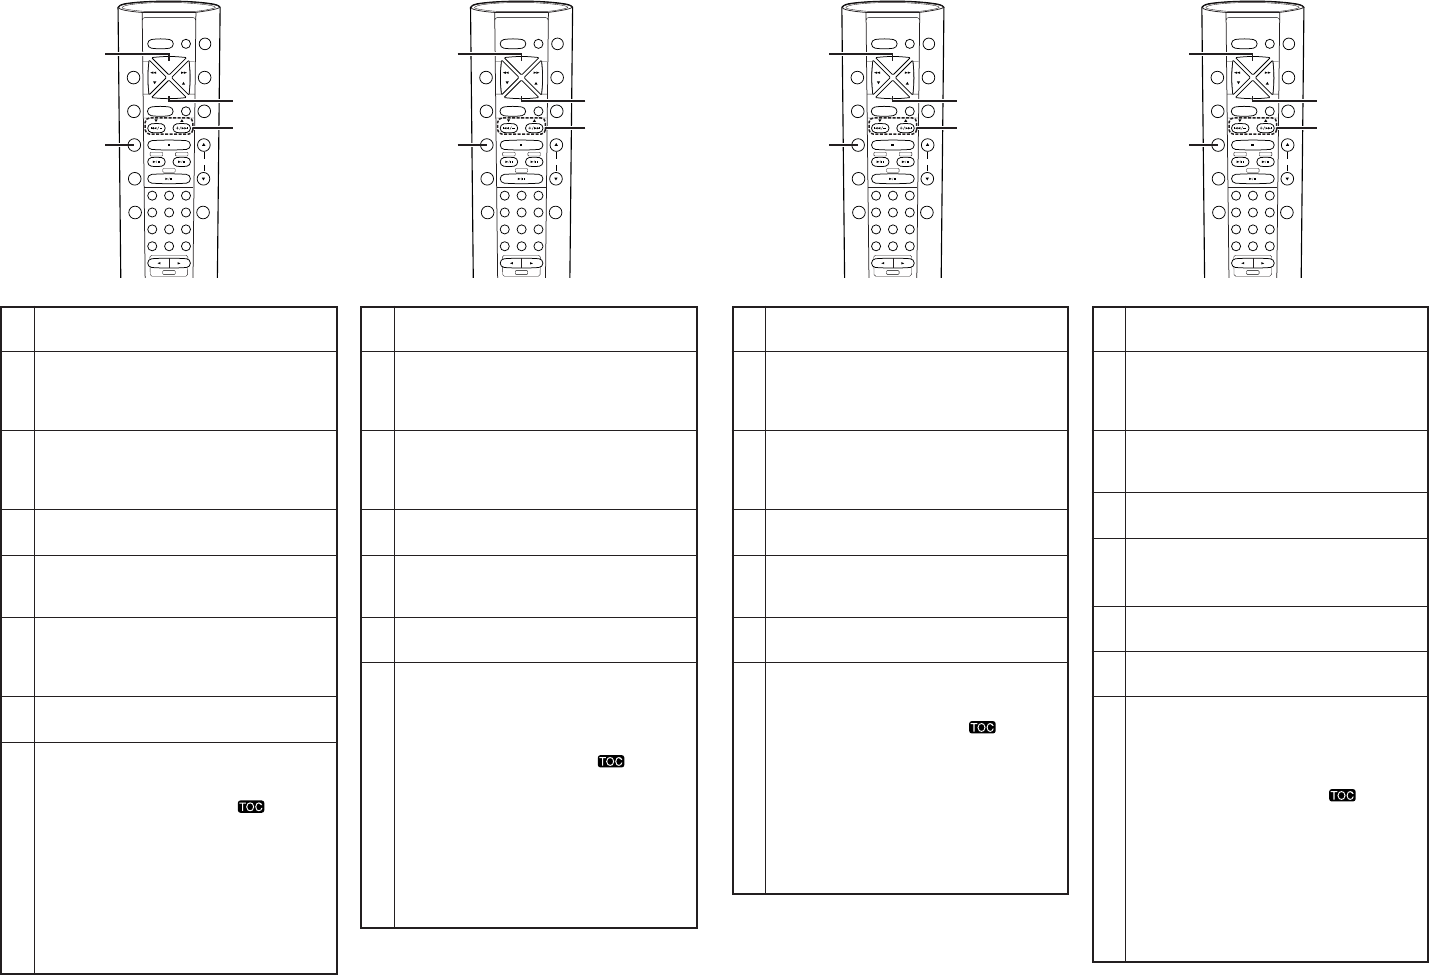
1
2
3
4
5
6
7
8
Insert a recorded disc which has registered
groups into the disc insertion slot.
In the stop mode, press the GROUP/PROG/
DIRECT button.
•“
1Group Mode
” is displayed.
• The “GROUP” indicator lights.
Press the automatic search buttons (8 and
9) and select the group whose title you wish
to delete.
• Display “
01Gp
CC (Title)”.
Press the EDIT button.
•“
Edit Mode
” is displayed.
Press one of the automatic search buttons (
8
and 9) on the remote control unit.
• Display “
Gp Name In?
”.
Press the ENTER button and enter the title of
the group.
• For instructions on inputting titles, see step 5
under “Adding disc titles” on page 25.
Press the EDIT button to enter the input group
title.
Press the 5 (eject) button on the main unit.
• The title will change.
• The TOC data is written and the disc is ejected.
• When TOC writing starts, the “” indicator
flashes. Do not shake the main unit, or unplug
the power supply cord while the TOC is being
written. If the data is not recorded properly, it
will not be possible to play the disc.
• The TOC data can also be recorded by
performing the following operations:
• Pressing the power button to set the power
to the standby mode.
• In the stop mode, press the
2 (stop) button.
4. Changing the title of the group
+1010
PANEL
CALL
DISC
SKIP
GROUP
CT
PTY
REPEAT
RDS
RANDOM
TITLE/CHARACTER TIME
EDIT
TUNING TUNING
ENTER
MEMORY
TONE/SDB
TUNER
PRESET
BAND
CD-R MD
CD
123
654
987
CLEAR
TAP E
DISPLAY
VOLUME
FUNCTION
SLEEP
SYSTEM
POWER
PROG/
DIRECT
6
3,5
4,7
2
1
2
3
4
5
6
7
Insert a recorded disc which has registered
groups into the disc insertion slot.
In the stop mode, press the GROUP/PROG/
DIRECT button.
•“
1Group Mode
” is displayed.
• The “GROUP” indicator lights.
Press the automatic search buttons (8 and
9) and select the group that you wish to
cancel.
• Display “
02Gp
CC (Title)”.
Press the EDIT button.
•“
Edit Mode
” is displayed.
Press one of the automatic search buttons (
8
and 9) on the remote control unit.
• Display “
Group Cancel?
”.
Press the ENTER button.
•“
Complete
” is displayed.
Press the 5 (eject) button on the main unit.
• Group 2 will be cancelled.
Note that once cancelled, group 3 will
automatically change to group 2.
• The TOC data is written and the disc is ejected.
• When TOC writing starts, the “” indicator
flashes. Do not shake the main unit, or unplug
the power supply cord while the TOC is being
written. If the data is not recorded properly, it
will not be possible to play the disc.
• The TOC data can also be recorded by
performing the following operations:
• Pressing the power button to set the power
to the standby mode.
• In the stop mode, press the
2 (stop) button.
5. Cancel a group
+1010
PANEL
CALL
DISC
SKIP
GROUP
CT
PTY
REPEAT
RDS
RANDOM
TITLE/CHARACTER TIME
EDIT
TUNING TUNING
ENTER
MEMORY
TONE/SDB
TUNER
PRESET
BAND
CD-R MD
CD
123
654
987
CLEAR
TAPE
DISPLAY
VOLUME
FUNCTION
SLEEP
SYSTEM
POWER
PROG/
DIRECT
6
3,5
4
2
1
2
3
4
5
6
7
Insert a recorded disc which has registered
groups into the disc insertion slot.
In the stop mode, press the GROUP/PROG/
DIRECT button.
•“
1Group Mode
” is displayed.
• The “GROUP” indicator lights.
Press the automatic search buttons (8 and
9) and select the group whose title you wish
to delete.
• Display “
02Gp
CC (Title)”.
Press the EDIT button.
•“
Edit Mode
” is displayed.
Press one of the automatic search buttons (
8
and 9) on the remote control unit.
• Display “
Gp N. Erase?
”.
Press the ENTER button.
•“
Complete
” is displayed.
Press the 5 (eject) button on the main unit.
• The title will be deleted.
• The TOC data is written and the disc is ejected.
• When TOC writing starts, the “” indicator
flashes. Do not shake the main unit, or unplug
the power supply cord while the TOC is being
written. If the data is not recorded properly, it
will not be possible to play the disc.
• The TOC data can also be recorded by
performing the following operations:
• Pressing the power button to set the power
to the standby mode.
• In the stop mode, press the
2 (stop) button.
6. Delete the title of a group
+1010
PANEL
CALL
DISC
SKIP
GROUP
CT
PTY
REPEAT
RDS
RANDOM
TITLE/CHARACTER TIME
EDIT
TUNING TUNING
ENTER
MEMORY
TONE/SDB
TUNER
PRESET
BAND
CD-R MD
CD
123
654
987
CLEAR
TAP E
DISPLAY
VOLUME
FUNCTION
SLEEP
SYSTEM
POWER
PROG/
DIRECT
6
3,5
4
2
1
2
3
4
5
6
7
8
Insert a recorded disc which has registered
groups into the disc insertion slot.
In the stop mode, press the GROUP/PROG/
DIRECT button.
•“
1Group Mode
” is displayed.
• The “GROUP” indicator lights.
Press the automatic search buttons (8 and
9) and select the group you wish to delete.
• Display “
01Gp
CC (Title)”.
Press the EDIT button.
•“
Edit Mode
” is displayed.
Press one of the automatic search buttons (
8
and 9) on the remote control unit.
• Display “
Group Erase?
”.
Press the ENTER button.
•“
Erase OK?
” is displayed.
Press the ENTER button.
•“
Complete
” is displayed.
Press the 5 (eject) button on the main unit.
• Group 1 will be deleted. Note that once deleted,
group 2 will automatically move to the place of
group 1.
• The TOC data is written and the disc is ejected.
• When TOC writing starts, the “” indicator
flashes. Do not shake the main unit, or unplug
the power supply cord while the TOC is being
written. If the data is not recorded properly, it
will not be possible to play the disc.
• The TOC data can also be recorded by
performing the following operations:
• Pressing the power button to set the power
to the standby mode.
• In the stop mode, press the
2 (stop) button.
7. Delete a group
+1010
PANEL
CALL
DISC
SKIP
GROUP
CT
PTY
REPEAT
RDS
RANDOM
TITLE/CHARACTER TIME
EDIT
TUNING TUNING
ENTER
MEMORY
TONE/SDB
TUNER
PRESET
BAND
CD-R MD
CD
123
654
987
CLEAR
TAPE
DISPLAY
VOLUME
FUNCTION
SLEEP
SYSTEM
POWER
PROG/
DIRECT
6,7
3,5
4
2
Example: Changing the title of group 1 Example: Perform group cancellation of group 2 Example: Delete the title of group 2 Example: Delete group 1
 (2 pages)
 Manymanuals.com
 Manymanuals.de
 Manymanuals.fr
 Manymanuals.it
 Manymanuals.pl
 Manymanuals.cz
 Manymanuals.es
 Manymanuals-pt.com
Comments to this Manuals