r-
I
I
i
TIMER
RECORDING/PLAYBACK
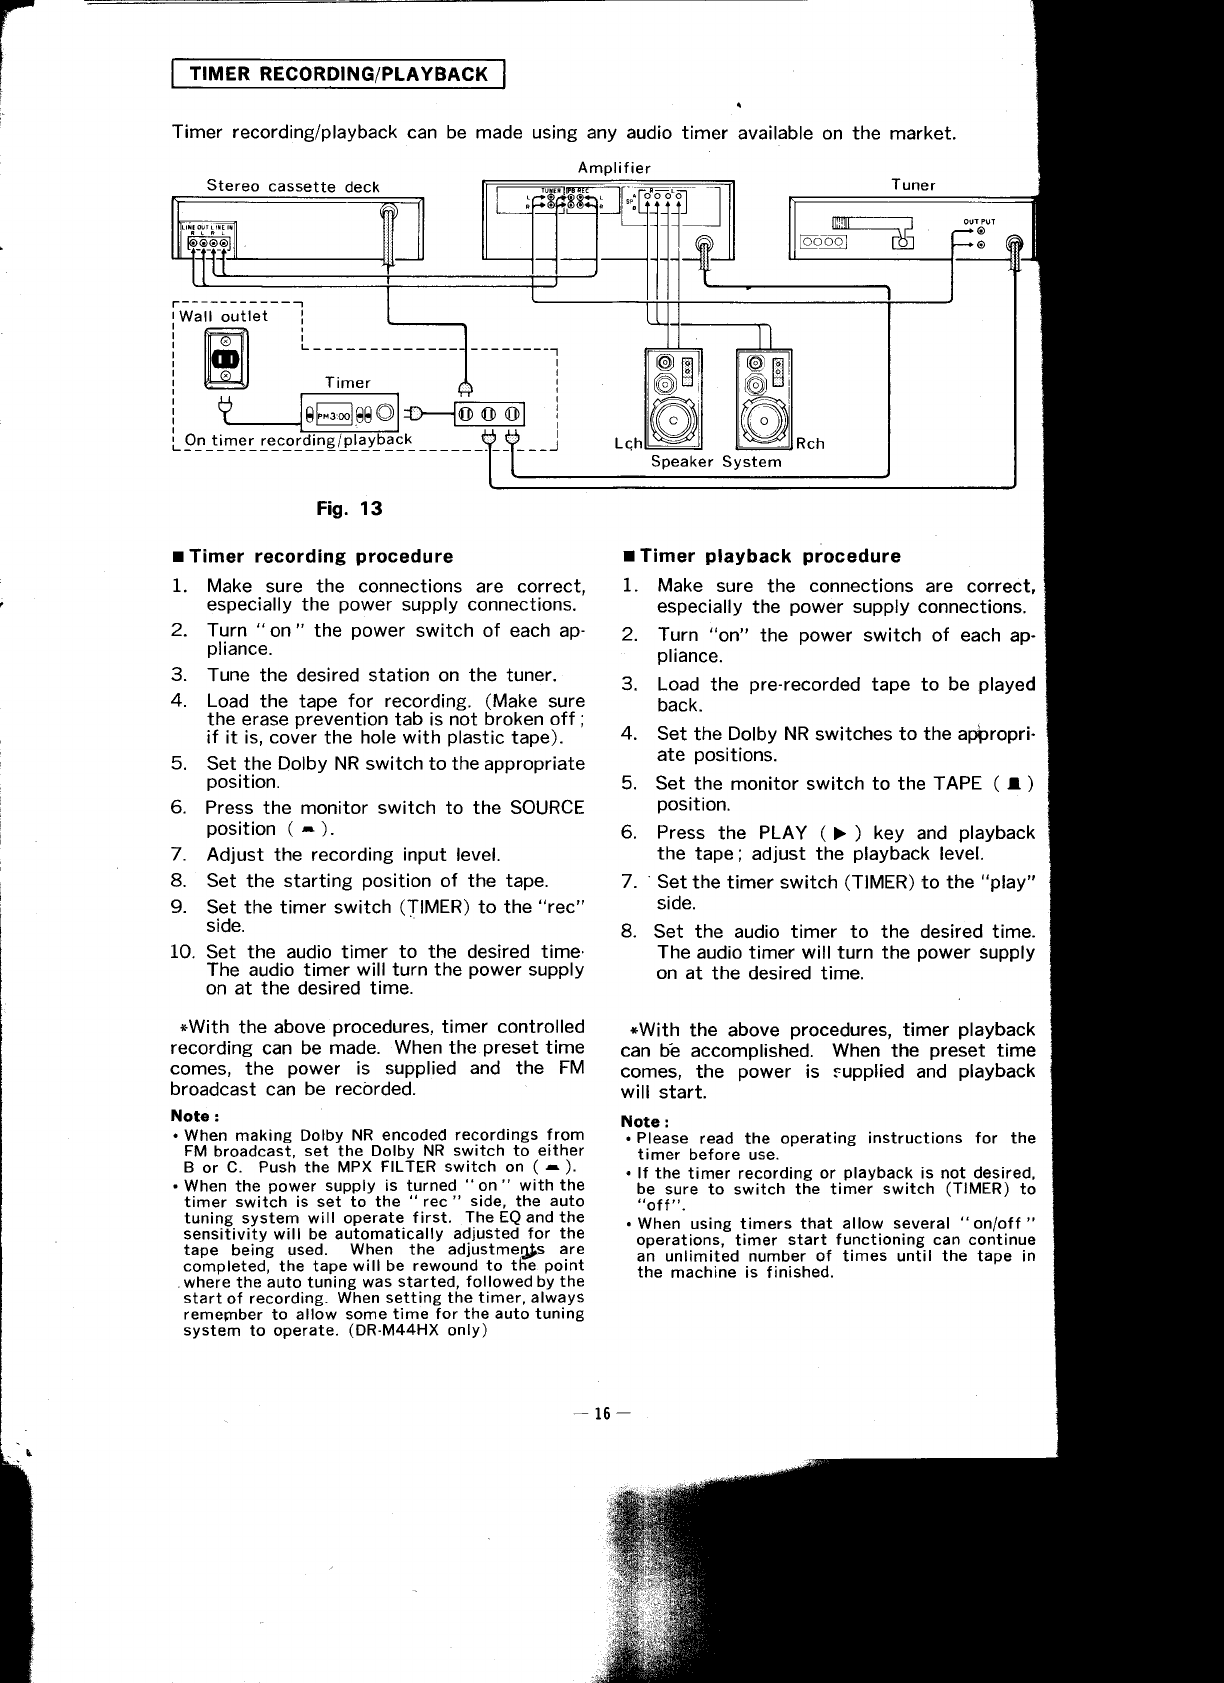
Timer recording/playback
can be made using any audio
timer
avaitable on the market.
Stereo
cassette
deck
Tuner
I
L---_---------
Timer
---------l
Speaker
System
Fis. 13
r
Timer recording
procedure
1. Make
sure the connections are
correct,
especially
the
power
supply
connections.
2.
Turn
"
on
"
the
power
switch of each ap-
pliance.
3.
Tune the desired station on the tuner.
4.
Load
the tape
for recording.
(Make
sure
the erase
prevention
tab is not
broken off;
if it is, cover
the
hole with
plastic
tape).
5.
Set the
Dolby
NR switch to the appropriate
position.
6.
Press the monitor switch to the SOURCE
Position
(
^
).
7.
Adjust the recording
input
level.
8. Set
the
starting
position
of the tape.
9.
Set the timer switch
(TIMER)
to the
"rec"
side.
10.
Set the audio timer
to the
desired
time.
The audio timer
will
turn
the
power
supply
on at the desired time.
*With
the above
procedures,
timer controlled
recording
can be
made. When the
preset
time
comes,
the
power
is supplied and the
FM
broadcast
can
be recorded.
Note:
.
When making Dolby
NR encoded recordings
from
FM
broadcast,
set
the
Dolby NR
switch
to
either
B
or
C. Push the MPX
FILTER switch on
(
r
).
.
When
the
power
supply is
turned
"
on
"
with
the
timer
switch is set to the
"
rec "
side,
the
auto
tuning system will operate
first.
The EQ and the
sensitivity will be automatically
adjusted
for the
tape
being
used.
When
the
adjustme4;fs
are
completed, the tape will be
rewound to
the
point
.
where the
auto
tuning
was
started, followed by the
start
of
recording.
When setting the timer,
always
remember
to
allow some time
for the auto tuning
system
to operate.
(DR-M44HX
only)
I
Timer
playback
procedure
1. Make
sure
the
connections
are correct,
especially
the
power
supply connections.
2.
Turn
"on"
the
power
switch of each
ap-
pliance.
3. Load
the
pre-recorded
tape to
be
played
back.
4.
Set
the
Dolby NR
switches to
the apiropri-
ate
positions.
5. Set
the monitor switch to the TAPE
(
r
)
position.
6. Press
the
PLAY
(
>
)
key
and
playback
the
tape; adjust the
playback
level.
7. Set
the timer switch
(TIMER)
to
the
"play"
side.
8.
Set the audio timer to the desired time.
The
audio timer will turn the
power
supply
on at
the desired time.
*With
the above
procedures,
timer
playback
can
b'e accomplished.
When
the
preset
time
comes,
the
power
is supplied and
playback
will
start.
Note:
.
Please
read the operating
instructions for the
timer
before use.
.
lf the
timer recording
or
playback
is not desired,
be
sure to switch the timer
switch
(TIMER)
to
"oft".
.
When using timers that
allow several
"
onloff
"
operations,
timer
start functioning can continue
an unlimited number of times until the tape in
the
machine is finished.
-.t
-15-


 (69 pages)
 (25 pages)
 Manymanuals.com
 Manymanuals.de
 Manymanuals.fr
 Manymanuals.it
 Manymanuals.pl
 Manymanuals.cz
 Manymanuals.es
 Manymanuals-pt.com
Comments to this Manuals