ITALIANOFRANCAIS
Getting started
Thank you for purchasing your Denon Urban Raver™ headphones. Read this
manual and attached “Quick Guide” and “Precautions on the use of headphones”
documentation carefully beforehand to use the headphones properly.
Accessories
q Quick Guide .................................................................................................... 1
w Precautions on the use of headphones ......................................................... 1
e Audio cable (length: approx. 1.3 m)............................................................... 1
r USB cable (for charging, length: approx. 1.3 m) ........................................... 1
t Adapter plug................................................................................................... 1
y Carrying Case ................................................................................................. 1
Features
Headphones with a built-in high power amplifi er
A high power amplifi er powered by a battery included in the headphones drives
the large driver of 50 mm diameter powerfully to achieve rich and powerful bass
during playback.
Ear pads that employ Denon proprietary pentagonal shaped memory foam
Ear pads that fl exibly fi t your natural ear shape while fully covering your ears to
achieve a superb fi t and high fi delity audio experience.
Denon’s patent-pending control wheel allows for playback control of Apple
®
devices
Control wheel on right ear cup for easy control of playback operation and
volume +/– adjustment of Apple iPod / iPhone / iPad. The left control wheel
controls the illumination of the Blue LED ring around both control wheels, for a
high impact appearance (ON/OFF / Brightness).
Hands-free calling compatibility
Hands-free calling is possible with the headphones on when you receive a call
while listening to audio on iPhone.
Rechargeable battery
Rechargeable battery provides 12 hours of listening enjoyment. When the
battery runs out you can still listen to music in passive mode.
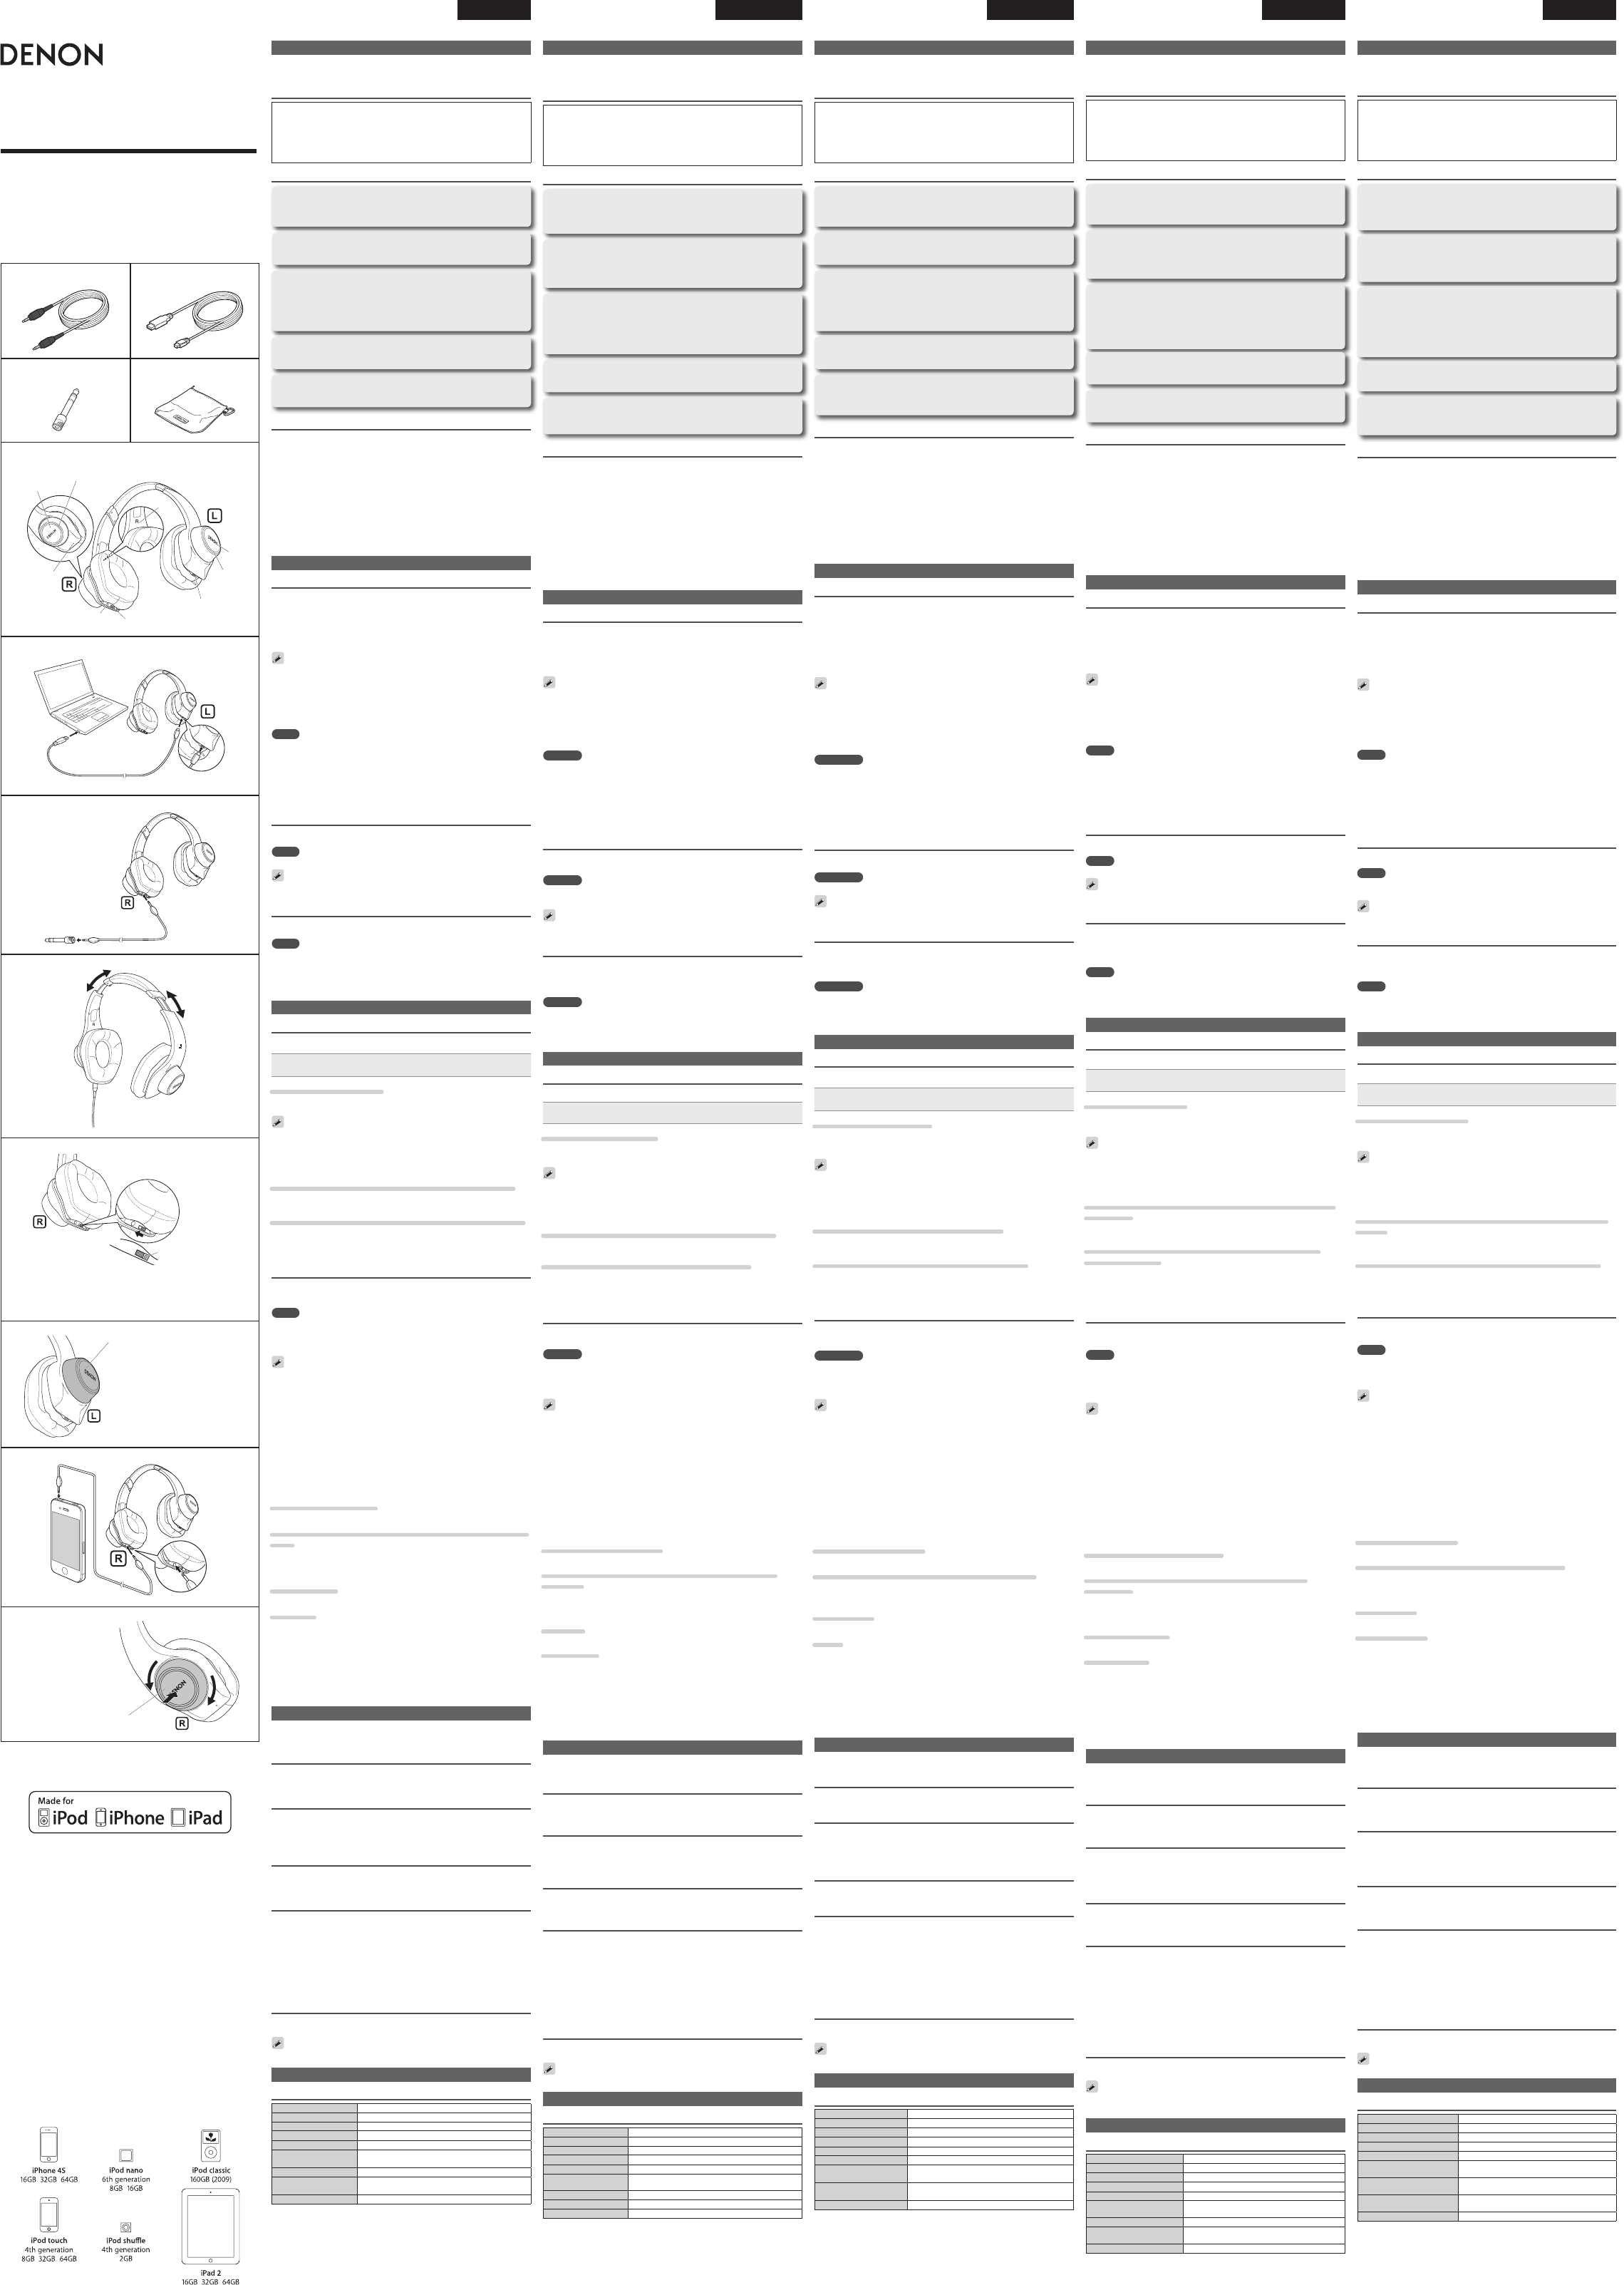
Functions (vA)
q Illumination switch button
Switches the illumination indicator.
w Illumination indicator
Lights red or blue based on the status.
e Charging port (USB connection port)
Connected to the included USB cable to charge the headphones’ battery.
r Control wheel
Controls Apple products with remote control support.
t Call microphone
y Power switch
u Stereo mini jack
Connector for the included audio cable.
i L/R indication
Preparing the Headphones
Charging the battery (vB)
Charge the headphones’ battery when fi rst using them after purchase or when the
battery level is low by connecting the headphones to a computer using the included
USB cable.
The illumination indicator on the left will fl ash when the battery is being charged.
• 0% to 49% charged: Slowly fl ashes red.
• 50% to 99% charged: Flashes red every 2 seconds.
• 100% charged: The illumination indicator on the left turns off.
• When the battery level is low, the illumination indicator on the left will fl ash red
every 3 seconds.
• When fully charged, the battery provides approx. 12 hours of audio playback
time with the normal volume.
• Audio can be played back and phone calls can be made while the battery is
being charged. In this case, depending on the computer being used, some
noise may mix with the headphones audio.
NOTE
• If the battery runs out during use, the amplifi er and LED illumination on the
headphones will turn off, but you can still listen to music in passive mode.
• Usage time may vary depending on the usage environment’s temperature,
method of use, etc.
• If usage time is extremely short even when the battery has been fully charged,
the battery may be near the end of its life. In this case, please contact DENON
service center.
• Do not try to replace a battery.
Connecting the headphones with your audio device (vC)
Use the included audio cable to connect the stereo mini jack on the headphones
and the headphone port on your audio device.
NOTE
First connect the included audio cable to the stereo mini jack on the headphones.
Use the 1/4” gold-plated adapter jack (included), if the headphone port on your
audio device requires that size.
Adjusting the fi t of the headphones (vD)
Check the hanger marks and fi t “L” to the left ear and “R” to the right ear.
Adjust the slider length to fi t your head when wearing the headphones.
NOTE
• Please read the attached “Precautions on the use of headphones”
documentation.
• Avoid getting your fi ngers or other body parts caught in the product’s moving
portions.
• Do not pull forcefully on the sliders.
Using the Headphones
Turning on the headphones (vE)
Turning on the headphones activates the built-in equalizer amplifi er, allowing you to
enjoy powerful audio playback.
Move the power switch in the arrow direction.
• The headphones are turned on.
Turning off the headphones
Move the power switch in the opposite direction of the arrow.
• The headphones are turned off. You can still listen to music in passive mode.
Audio playback and Apple product control are available even while the power of
the headphones is off.
nSwitching the illumination indicator (vF)
You can turn on/off or change brightness of illumination.
Switching the LED illumination On / Off on the control wheel
Press the illumination switch button on the left headphone.
• The indicator is switched on/off each time you press the button.
Adjusting the LED illumination Brightness on the control wheel
Press and hold the illumination switch button on the left headphone.
• The brightness switches while the button is held.
• You can choose from four levels of brightness. Release the illumination switch
button at the desired brightness.
Operating Apple products (vG)
When the headphones are connected to your Apple product with the included
audio cable, you can use the control wheel on the right headphone to perform
playback operations and adjust the volume.
NOTE
• The headphones cannot operate devices other than Apple products.
• The included audio cable is a cable that is compatible with Apple product
control. Apple product control may not be available when a different cable is
used.
• Use the latest Apple software.
• All operations comply with the Apple genuine remote control.
• You can use the remote control and microphone of the headphones for iPod
nano (the fourth generation or later), iPod classic (120/160 GB), iPod touch (the
second generation or later), iPhone 3GS and later, and iPad.
• You can also use the remote control of the headphones for iPod shuffl e (the
third generation or later).
• Audio playback is available for all iPod models.
nPlaying back (vH)
Press the control wheel once.
• Each press switches between playback and pause.
nSkipping a track (vH)
Skipping to the next track
Press the control wheel twice quickly.
Skipping to the beginning of the current track or to the previous
track
Press the control wheel three times quickly.
nFast-forwarding/rewinding (vH)
Fast-forwarding
Press the control wheel once quickly and then hold it.
Rewinding
Press the control wheel twice quickly and then hold it.
nAdjusting the volume (vH)
Turn the control wheel clockwise or counterclockwise.
nChecking the track name and artist name of the current track
(Voice Over function) (
vH)
Press and hold the control wheel for two seconds or longer.
Conducting Phone Calls
You can make phone calls while the headphones on. The other party’s voice comes
over the headphones while your voice is picked up by the built-in microphone of
the headphones.
Making a call
Dial the phone number using your mobile phone.
When you make a call, audio playback will be paused temporarily until the call has
been ended.
Answering an incoming call (vH)
When an incoming call is detected, you will hear the music pause and a ringtone
sound come over the headphones.
Press the control wheel once.
• This answers and starts the call.
Ending a call (vH)
Press the control wheel once.
• This ends the call, and playback of the music that you were listening to will
resume automatically.
Using the call waiting function
Use either of the following methods to take an incoming call while a call is in
progress.
nEnd the current call and take the new call (vH)
Press and hold the control wheel for two seconds or longer.
nPut the current call on hold and take the new call / switch to
the on-hold call (
vH)
Press the control wheel.
Ignoring an incoming call (vH)
When an incoming call is detected, press and hold the control wheel for
two seconds or longer.
Turn the control wheel to adjust the volume level of the other party’s voice.
Additional Information
Product specifi cations
Driver type Dynamic type
Driver size Ø 50 mm
Sensitivity 108 dB/mW (With power on)
Input impedance
64 Ω (With power on)
Playback frequency 5 to 37,000 Hz
Continuous playback
time
Approx. 12 hours
Operating temperature 5 °C to 40 °C
Power supply
DC 3.7 V built-in rechargeable lithium polymer
battery
Weight 310 g
ENGLISH
AH-D401
URBAN
RAVER
TM
Over Ear Headphones
Owner’s Manual /
Bedienungsanleitung
/
Manuel de l’Utilisateur
/ Manuale delle istruzioni /
Manual del usuario / Gebruiksaanwijzing /
Bruksanvisning / Инструкция по эксплуатации /
Instrukcja obsługi
DEUTSCH ESPAÑOL
Erste Schritte
Danke, dass Sie sich für den Denon Urban Raver™-Kopfhörer entschieden
haben. Lesen Sie sich zunächst sorgfältig die im Produktumfang befi ndliche
Schnelleinführung und die Sicherheitshinweise zur Benutzung des Kopfhörers durch,
damit Sie ihn richtig verwenden.
Zubehör
q Kurzanleitung.................................................................................................. 1
w Vorsichtsmaßnahmen bei Verwendung des Kopfhörers............................... 1
e Audiokabel (Länge ca. 1,3 m)......................................................................... 1
r USB-Kabel (zum Laden, Länge ca. 1,3 m) ...................................................... 1
t Adapterstecker ............................................................................................... 1
y Transportetui .................................................................................................. 1
Merkmale
Kopfhörer mit integriertem Hochleistungsverstärker
Ein Hochleistungsverstärker, der durch einen Akkumulator im Kopfhörer
gespeist wird, versorgt die große, im Durchmesser 50 mm messende
Membran mit viel Leistung und sorgt so für einen satten und kräftigen Bass
bei der Wiedergabe.
Ohrmuschelpolster, die auf die patentierte Memory-Foam-Technologie von
Denon in Fünfeckform setzen
Die Ohrmuschelpolster passen sich perfekt der natürlichen Form Ihres Ohrs an,
wobei sie es vollständig umschließen. Das Ergebnis ist perfekter Sitz und ein
Hi-Fi-Tonerlebnis sondergleichen.
Das ebenfalls patentierte Steuerrad von Denon ermöglicht die
Wiedergabesteuerung von Apple
®
-Geräten
Das Steuerrad befi ndet sich auf der rechten Kopfhörermuschel, sodass
die Wiedergabe und Lautstärke auf iPods, iPhones und iPads ganz einfach
gesteuert und reguliert werden können. Mit dem linken Steuerrad kann die
Intensität des blauen LED-Rings reguliert werden, der beide Steuerräder
umschließt (EIN/AUS/Leuchtintensität). Für einen gelungenen Auftritt!
Freisprecheinrichtung
Wenn Sie einen Anruf erhalten, während Sie sich Musik auf Ihrem iPhone
anhören, ist das Freisprechen mit aufgesetztem Kopfhörer möglich.
Akku
Der wiederaufl adbare Akku ermöglicht 12 Stunden Musikgenuss. Sollte
der Akku einmal leer sein, so ist es auch möglich, im passiven Modus
weiterzuhören.
Funktionen (vA)
q Beleuchtungsschalter
Schaltet die Beleuchtungsanzeige um.
w Beleuchtungsanzeige
Leuchte rot oder blau, abhängig vom Status.
e Anschluss zum Aufl aden (USB-Anschluss)
Mit dem im Produktumfang befi ndlichen USB-Kabel kann der Akku des
Kopfhörers geladen werden.
r Steuerrad
Damit können Apple-Produkte gesteuert werden, die die Fernbedienung
unterstützen.
t Mikrofon für Anrufe
y Ein/Aus-Schalter
u Miniklinkenstecker (Stereo)
Stecker für das mitgelieferte Audiokabel.
i L/R-Markierung
Vorbereiten der Kopfhörer
Laden des Akkus (vB)
Laden Sie den Akku des Kopfhörers auf, wenn Sie ihn nach dem Kauf das erste Mal
verwenden möchten oder der Akkustand niedrig ist, indem Sie den Kopfhörer mit
dem mitgelieferten USB-Kabel an einen Computer anschließen.
Die Beleuchtungsanzeige links blinkt, während der Akku geladen wird.
• Akkustand 0 bis 49 %: langsames Blinken, rot.
• Akkustand 50 bis 99 %: Blinken alle 2 Sekunden, rot.
• Akkustand 100 %: Beleuchtungsanzeige links wird ausgeblendet.
• Wenn der Akkustand niedrig ist, blinkt die Beleuchtungsanzeige links alle 3
Sekunden rot.
• Bei voller Ladung bietet der Akku etwa 12 Stunden Audiowiedergabe bei
normaler Lautstärke.
• Während der Akku geladen wird, können Musik wiedergegeben und
Telefongespräche geführt werden. Hierbei kann es, abhängig vom für die
Aufl adung verwendeten Computer, zu einigen wenigen Störgeräuschen bei der
Tonwiedergabe des Kopfhörers kommen.
HINWEIS
• Wenn sich der Akku während der Nutzung erschöpft, werden der Verstärker und
die LED-Beleuchtung des Kopfhörers a/jointfilesconvert/217097/bgeschaltet. Die weitere Tonwiedergabe
erfolgt ab diesem Zeitpunkt im passiven Modus.
• Die Nutzungszeit kann abhängig von der Umgebungstemperatur, Betriebsart
usw. variieren.
• Sollte die Nutzungszeit extrem kurz ausfallen, selbst wenn der Akku vollständig
aufgeladen wurde, könnte der Akku das Ende seiner Lebensdauer erreicht
haben. Wenden Sie sich in einem solchen Fall an den Kundendienst von
DENON.
• Versuchen Sie nicht, den Akku selbst zu wechseln.
Anschließen der Kopfhörer an Ihr Audiogerät (vC)
Verwenden Sie das im Produktumfang befi ndliche Audiokabel, um den Stereo-
Miniklinkenstecker des Kopfhörers an den Kopfhöreranschluss Ihres Audiogeräts
anzuschließen.
HINWEIS
Schließen Sie zuerst das beigefügte Audiokabel an den Stereo-Miniklinkenstecker
am Kopfhörer an.
Verwenden Sie den mitgelieferten 6,35-mm-Adapter, falls der Kopfhöreranschluss
auf Ihrem Gerät nur diese Größe bietet.
Einstellen der Passform der Kopfhörer (vD)
Überprüfen Sie die Kennzeichnung der Kopfhörermuscheln und achten Sie darauf,
dass sich die mit “L“ gekennzeichnete Seite auf Ihrem linken und die mit “R“
gekennzeichnete Seite auf Ihrem rechten Ohr befi ndet.
Stellen Sie den Schieber auf Ihren Kopf ein, wenn Sie den Kopfhörer tragen.
(vC)
HINWEIS
• Bitte lesen Sie sich die angefügten Sicherheitshinweise zur Benutzung des
Kopfhörers durch.
• Achten Sie darauf, dass Sie Ihre Finger oder andere Körperteile nicht zwischen
die beweglichen Teile des Produkts klemmen.
• Ziehen Sie niemals fest an den Schiebern.
Verwenden der Kopfhörer
Einschalten der Kopfhörer (vE)
Wenn Sie den Kopfhörer einschalten, wird der integrierte EQ-Verstärker aktiviert,
der für eine kraftvolle Audiowiedergabe sorgt.
Bewegen Sie den Netzschalter in Pfeilrichtung.
• Der Kopfhörer ist eingeschaltet.
Ausschalten des Kopfhörers
Bewegen Sie den Netzschalter entgegen der Pfeilrichtung.
• Der Kopfhörer ist ausgeschaltet. Sie können sich Musik auch weiterhin im
passiven Modus anhören.
Die Audiowiedergabe und Apple-Produktsteuerung sind auch dann noch
verfügbar, wenn der Kopfhörer eigentlich ausgeschaltet ist.
nUmschalten der Beleuchtungsanzeige (vF)
Sie können die Beleuchtung ein- oder ausschalten und die Helligkeit regeln.
Ein-/Ausschalten der LED-Beleuchtung mit dem Steuerrad
Drücken Sie den Beleuchtungsschalter auf der linken Muschel.
• Die Anzeige wird ein- oder ausgeschaltet, wenn Sie die Taste drücken.
Regulieren der LED-Beleuchtung mit dem Steuerrad
Drücken Sie den Beleuchtungsschalter auf der linken Muschel und halten Sie ihn
gedrückt.
• Die Helligkeit wird umgeschaltet, während der Schalter gedrückt gehalten wird.
• Sie haben die Auswahl zwischen vier Helligkeitsstufen. Lassen Sie den
Beleuchtungsschalter bei der gewünschten Helligkeitsstufe los.
Bedienen von Apple-Produkten (vG)
Wenn Sie den Kopfhörer mithilfe des mitgelieferten Audiokabels an Ihr Apple-
Produkt anschließen, können Sie das Steuerrad auf der rechten Muschel dazu
verwenden, die Wiedergabe zu steuern und die Lautstärke zu regulieren.
HINWEIS
• Der Kopfhörer kann nicht zur Steuerung anderer Produkte als derjenigen von
Apple verwendet werden.
• Das im Produktumfang befi ndliche Audiokabel ist mit der Apple-
Produktsteuerung kompatibel. Die Apple-Produktsteuerung steht bei
Verwendung eines anderen Kabels möglicherweise nicht zur Verfügung.
• Verwenden Sie die aktuelle Apple-Software.
• Alle Steuerungsvorgänge entsprechen den authentischen Apple-
Fernsteuerungsfunktionen.
• Sie können die Fernbedienung und das Mikrofon des Kopfhörers für die
folgenden Geräte einsetzen: iPod nano (4. Generation oder neuer), iPod classic
(120/160 GB), iPod touch (2. Generation oder neuer), iPhone 3GS, iPhone 3GS
und höher, und iPad.
• Sie haben die Möglichkeit, die Fernsteuerung des Kopfhörers mit dem
folgenden Gerät zu verwenden: iPod shuffl e (3. Generation oder neuer).
• Die Audiowiedergabe steht für alle iPod-Modelle zur Verfügung.
nWiedergabe (vH)
Steuerrad einmal drücken.
• Bei jeder Betätigung wird zwischen Wiedergabe und Pause gewechselt.
nTitel überspringen (vH)
Zum nächsten Titel wechseln
Steuerrad schnell zweimal hintereinander drücken.
Zum Beginn des aktuellen Titels oder zum vorherigen Titel
wechseln
Steuerrad schnell dreimal hintereinander drücken.
nVor-/Zurückspulen (vH)
Vorspulen
Steuerrad schnell einmal drücken und gedrückt halten.
Zurückspulen
Steuerrad schnell zweimal drücken und gedrückt halten.
nLautstärke einstellen (vH)
Steuerrad im oder entgegen dem Uhrzeigersinn drehen.
nNamen und Interpreten des aktuellen Titels abrufen
(Stimmbefehl) (
vH)
Steuerrad drücken und zwei Sekunden oder länger gedrückt halten.
Ausführen von Telefongesprächen
Sie können Telefonanrufe tätigen, während Sie Ihren Kopfhörer tragen. Die Stimme
des Gesprächspartners wird über den Kopfhörer wiedergegeben, während Ihre
eigene Stimme über das integrierte Mikrofon des Kopfhörers übertragen wird.
Vornehmen eines Anrufs
Wählen Sie die gewünschte Telefonnummer auf Ihrem Mobiltelefon.
Wenn Sie einen Anruf tätigen, wird die Audiowiedergabe vorübergehend pausiert,
bis der Anruf beendet wird.
Annehmen eines eingehenden Anrufs (vH)
Wird ein eingehender Anruf festgestellt, wird die Wiedergabe pausiert. Stattdessen
nehmen Sie einen Klingelton über Ihren Kopfhörer wahr.
Drücken Sie das Steuerrad einmal.
• So nehmen Sie den Anruf entgegen.
Beenden eines Anrufs (vH)
Drücken Sie das Steuerrad einmal.
• Damit wird das Gespräch beendet und die Wiedergabe wird automatisch
fortgesetzt.
Verwenden der Anruf-halten-Funktion
Die folgenden beiden Methoden stehen Ihnen zur Verfügung, um einen eingehenden
Anruf entgegenzunehmen, während Sie bereits ein anderes Gespräch führen.
nDas aktuelle Gespräch beenden und den neuen Anruf
annehmen (
vH)
Steuerrad drücken und zwei Sekunden oder länger gedrückt halten.
nAktuelles Gespräch halten und neuen Anruf entgegennehmen/
zum gehaltenen Gespräch zurückwechseln (
vH)
Steuerrad drücken.
Eingehenden Anruf ignorieren (vH)
Wird ein eingehender Anruf festgestellt, so drücken Sie das Steuerrad und
halten Sie es zwei Sekunden oder länger gedrückt.
Drehen Sie das Steuerrad, um die Lautstärke der Stimmwiedergabe anzupassen.
Weitere Informationen
Technische Daten
Wandlerprinzip Dynamisch
Membrangröße Ø 50 mm
Empfi ndlichkeit 108 dB/mW (eingeschaltet)
Eingangsimpedanz
64 Ω (eingeschaltet)
Wiedergabefrequenz 5 bis 37.000 Hz
Dauer fortlaufende
Wiedergabe
Etwa 12 Stunden
Betriebstemperatur 5 bis 40 °C
Stromversorgung Integrierter Lithium-Polymer-Akku, 3,7 V Gleichstrom
Gewicht 310 g
“Made for iPod,” “Made for iPhone,” and “Made for iPad” mean that
an electronic accessory has been designed to connect specifi cally
to iPod, iPhone, or iPad, respectively, and has been certifi ed by
the developer to meet Apple performance standards. Apple is
not responsible for the operation of this device or its compliance
with safety and regulatory standards. Please note that the use of
this accessory with iPod, iPhone, or iPad may affect wireless
performance.
Apple is a registered trademark of Apple Inc., registered in the US
and other countries.
iPad, iPhone, iPod, iPod classic, iPod nano, iPod shuffl e, and iPod
touch are trademarks of Apple Inc., registered in the U.S. and other
countries.
The remote and mic are supported only by iPod nano (4th generation
and later), iPod classic (120/160GB), iPod touch (2nd generation and
later), iPhone 3GS and later, and iPad. The remote is supported by
iPod shuffl e (3rd generation and later). Audio is supported by all iPod
models.
n Apple products with remote control support /
Apple Produkte mit Fernbedienungsmöglichkeit /
Produits Apple avec prise en charge de la télécommande /
Prodotti Apple con telecomando compatibile con dispositivi
esterni / Productos Apple compatibles con el uso de mando
a distancia /
Apple-producten met ondersteuning voor afstandsbediening /
Apple-produkter med stöd för fjärrkontroll /
Продукция компании Apple с поддержкой функции
дистанционного управления /
Produkty Apple ze zdalnym sterowaniem /
Introduction
Nous vous remercions d’avoir acheté un casque Denon Urban Raver™. Veuillez
lire attentivement ce manuel ainsi que les annexes “Guide de référence rapide” et
“Précautions d’utilisation” avant d’utiliser votre casque.
Accessoires
q Guide de référence rapide ............................................................................. 1
w Précautions à prendre pour l’utilisation du casque audio ............................. 1
e Câble audio (longueur : 1,3 m environ) .......................................................... 1
r Câble USB (pour recharger la batterie, longueur : 1,3 m environ) ................ 1
t Prise adaptateur ............................................................................................. 1
y Boîtier de rangement ..................................................................................... 1
Caractéristiques
Casque avec amplifi cateur haute puissance intégré
Un amplifi cateur haute puissance alimenté par une batterie intégrée au casque
commande le grand circuit d’attaque de 50 mm de diamètre de façon à obtenir
des basses puissantes et riches lors de la lecture.
Coussinets pentagonaux en mousse Denon à mémoire de forme
Des coussinets prenant la forme de vos oreilles tout en les couvrant totalement
pour une adaptation parfaite et une expérience audio haute-fi délité.
Molette Denon en instance de brevet pour commander la lecture des
appareils Apple
®
Une molette sur l’écouteur droit pour commander la lecture et régler le volume d’un
iPod / iPhone / iPad Apple en toute simplicité. La molette de gauche commande
l’éclairage de l’anneau LED bleu autour des deux molettes, pour un impact visuel
fort (ON/OFF / Luminosité).
Compatibilité appels mains libres
Vous pouvez recevoir un appel mains libres lorsque vous portez le casque et
que vous écoutez de la musique sur votre iPhone.
Batterie rechargeable
La batterie rechargeable vous offre une autonomie de 12 heures. Lorsque la
batterie est épuisée, vous pouvez toujours écouter votre musique en mode
passif.
Fonctions (vA)
q Interrupteur témoin lumineux
Commande le témoin lumineux.
w Témoin lumineux
S’allume en rouge ou bleu en fonction de l’état.
e Port de charge (port USB)
Branché au câble USB fourni pour recharger la batterie du casque.
r Molette
Commande les produits Apple prenant en charge la télécommande.
t Micro d’appel
y Bouton d’alimentation
u Mini-prise stéréo
Connecteur pour le câble audio fourni.
i Indications L/R (gauche/droite)
Préparation du casque
Recharge de la batterie (vB)
Rechargez la batterie du casque lors de la première utilisation ou lorsque le niveau
de la batterie est faible en branchant le casque à un ordinateur à l’aide du câble
USB fourni.
Le témoin lumineux gauche clignote lorsque la batterie est en charge.
• De 0 % à 49 % du chargement : le témoin lumineux est rouge et clignote
lentement.
• De 50 % à 99 % du chargement : le témoin lumineux est rouge et clignote par
intervalles de 2 secondes.
• 100% du chargement : le témoin lumineux gauche s’éteint.
• Quand la batterie est faible, le témoin lumineux gauche est rouge et clignote
par intervalles de 3 secondes.
• Quand la batterie est totalement chargée, elle offre approximativement 12 heures
d’autonomie de lecture audio à un volume normal.
• La lecture audio et les appels téléphoniques restent disponibles lors du
chargement de la batterie. Dans ce cas, il est possible que vous entendiez des
interférences dans le casque, cela dépend de l’ordinateur utilisé.
REMARQUE
• Si la batterie est épuisée, l’amplifi cateur et l’éclairage LED du casque
s’éteindront mais vous pourrez toujours écouter votre musique en mode passif.
• L’autonomie peut varier en fonction de la température ambiante, du mode
d’utilisation, etc.
• Si l’autonomie est extrêmement limitée alors que vous aviez rechargé
totalement la batterie, il est possible que la batterie soit en fi n de vie. Dans ce
cas, contactez le centre de service DENON.
• N’essayez pas de remplacer vous-même la batterie.
Connexion du casque à votre périphérique audio (vC)
Utilisez le câble audio fourni pour brancher la mini-prise stéréo du casque au port
casque de votre appareil audio.
REMARQUE
Branchez d’abord le câble audio inclus à la mini-prise stéréo du casque.
Utilisez l’adaptateur plaqué or ¼ po (fourni) si le port casque de votre appareil
audio le requiert.
Ajustement du casque (vD)
Vérifi ez les indications sur chaque écouteur du casque pour les faire correspondre
à votre oreille gauche (“L”) et à votre oreille droite (“R”).
Réglez la longueur de la partie coulissante pour que le casque tienne bien sur
votre tête.
REMARQUE
• Veuillez lire l’annexe “Précautions d’utilisation”.
• Faites attention de ne pas coincer vos doigts ou d’autres parties de votre corps
dans les éléments mobiles du produit.
• Ne forcez pas les parties coulissantes.
Utilisation du casque
Mise sous tension du casque (vE)
Lorsque vous allumez le casque, l’amplifi cateur d’égalisation intégré est activé, ce
qui permet une lecture audio puissante.
Déplacez le bouton d’alimentation dans le sens de la fl èche.
• Le casque est allumé.
Mise hors tension du casque
Déplacez l’interrupteur dans le sens inverse de la fl èche.
• Le casque est éteint. Vous pouvez toujours écouter votre musique en mode
passif.
La lecture audio et la commande des produits Apple sont disponibles même
lorsque le casque est éteint.
nAllumer/éteindre le voyant lumineux (vF)
Vous pouvez allumer, éteindre ou modifi er la luminosité de l’éclairage.
Allumer/éteindre l’éclairage LED sur la molette
Appuyez sur l’interrupteur du témoin lumineux sur l’écouteur gauche.
• Le témoin s’allume ou s’éteint à chaque fois que vous appuyez sur le bouton.
Régler la luminosité de l’éclairage LED sur la molette
Maintenez l’interrupteur témoin lumineux sur l’écouteur gauche enfoncé.
• Tant que l’interrupteur est enfoncé, la luminosité varie.
• Vous pouvez choisir entre quatre niveaux de luminosité. Lâchez l’interrupteur
une fois la luminosité souhaitée atteinte.
Utilisation de produits Apple (vG)
Lorsque le casque est branché à votre produit Apple à l’aide du câble audio fourni,
vous pouvez utiliser la molette de l’écouteur droit pour en commander la lecture
et régler le volume.
REMARQUE
• Le casque ne peut pas faire fonctionner des produits autres que Apple.
• Le câble audio fourni est compatible avec la commande des produits Apple. La
commande des produits Apple peut ne pas être disponible lorsqu’un autre câble
est utilisé.
• Utilisez le dernier logiciel Apple.
• Toutes les opérations sont conformes à la télécommande authentique Apple.
• Vous pouvez utiliser la télécommande et le microphone du casque pour les
iPod nano (4e génération ou ultérieure), iPod classic (120/160 Go), iPod touch
(2e génération ou ultérieure), iPhone 3GS et les versions ultérieures, et iPad.
• Vous pouvez également utiliser la télécommande du casque pour les iPod
shuffl e (3e génération ou ultérieure).
• La lecture audio est disponible pour tous les modèles iPod.
nLancer la lecture (vH)
Appuyez une fois sur la molette.
• À chaque pression, vous passez de lecture à pause ou inversement.
nPasser un morceau (vH)
Passer au morceau suivant
Appuyez sur la molette deux fois rapidement.
Revenir au début du morceau ou au morceau précédent
Appuyez sur la molette trois fois rapidement.
nAvance rapide/retour (vH)
Avance rapide
Appuyez une fois rapidement sur la molette et ensuite maintenez-la enfoncée.
Retour
Appuyez deux fois rapidement sur la molette et ensuite maintenez-la enfoncée.
nRégler le volume (vH)
Tournez la molette dans le sens des aiguilles d’une montre ou dans le sens
inverse.
nConsulter le nom du morceau en lecture et le nom de l’artiste
(fonction Voice Over) (
vH)
Maintenez la molette enfoncée pendant deux secondes minimum.
Appels téléphoniques
Vous pouvez appeler quand le casque est allumé. La voix de votre correspondant
vous parvient via le casque et votre voix est captée par le micro intégré du casque.
Passer un appel
Composez le numéro sur votre téléphone portable.
En cas d’appel, la lecture audio est interrompue jusqu’à la fi n de cet appel.
Répondre à un appel entrant (vH)
Lorsqu’un appel entrant est détecté, la musique est interrompue et une sonnerie
vous parvient via le casque.
Appuyez une fois sur la molette.
• Vous répondez ainsi à l’appel et pouvez commencer la conversation.
Terminer un appel (vH)
Appuyez une fois sur la molette.
• Vous mettez ainsi fi n à l’appel et la lecture reprend automatiquement.
Utiliser la fonction de mise en attente d'appels
Choisissez l’une des options suivantes pour accepter un appel entrant lorsqu’un
autre appel est en cours.
nMettre fi n à l’appel en cours et prendre le nouvel appel
(vH)
Maintenez la molette enfoncée pendant deux secondes minimum.
nMettre l’appel en cours en attente et prendre le nouvel appel /
reprendre l’appel en attente (
vH)
Appuyez sur la molette.
Ignorer un appel entrant (vH)
Lorsqu’un appel entrant est détecté, appuyez sur la molette et
maintenez-la enfoncée pendant deux secondes minimum.
Tournez la molette pour régler le volume de la voix de votre correspondant.
Informations supplémentaires
Spécifi cations du produit
Type de circuit d’attaque Type dynamique
Taille de circuit d’attaque Ø 50 mm
Sensibilité 108 dB/mW (lorsqu’il est allumé)
Impédance en entrée
64 Ω (lorsqu’il est allumé)
Fréquence de lecture 5 à 37 000 Hz
Temps continu de lecture Environ 12 heures
Température de
fonctionnement
5 °C à 40 °C
Alimentation
Batterie polymère lithium CC 3,7 V rechargeable
intégrée
Poids 310 g
Guida introduttiva
Grazie per aver acquistato la cuffi a Denon Urban Raver™. Per un utilizzo corretto
della cuffi a, leggere il presente manuale, nonché la “Guida rapida” e il documento
allegato “Precauzioni sull’uso della cuffi a”.
Accessori
q Guida rapida ................................................................................................... 1
w Precauzioni sull’uso delle cuffi e .................................................................... 1
e Cavo audio (lunghezza: circa 1,3 m) .............................................................. 1
r Cavo USB (per la ricarica; lunghezza: circa 1,3 m) ........................................ 1
t Spinotto adattatore ........................................................................................ 1
y Supporto dei ricevitori .................................................................................... 1
Funzioni
Cuffi a con amplifi catore ad alta potenza incorporato
Un amplifi catore ad alta potenza alimentato da una batteria inserita nella cuffi a
controlla l’ampio driver da 50 mm di diametro e consente di ottenere acuti
ricchi e potenti durante la riproduzione.
Cuscinetti in schiuma a effetto memoria di forma pentagonale proprietaria
di Denon
I cuscinetti si adattano in modo fl essibile alla forma naturale dell’orecchio,
coprendolo completamente e garantendo al contempo un’esperienza audio
ottimale e ad alta fedeltà.
Rotella brevettata Denon per controllare la riproduzione dei dispositivi
Apple
®
L’apposita rotella sulla coppa destra consente di controllare facilmente la
riproduzione e la regolazione del volume di Apple iPod / iPhone / iPad. La rotella
sulla coppa sinistra consente invece di controllare l’illuminazione dell’anello
a LED blu (accensione/spegnimento/luminosità) presente su entrambe le
rondelle, per un impatto visivo notevole.
Compatibilità per chiamate a mani libere
È possibile utilizzare la cuffi a anche per ricevere una chiamata durante l’ascolto
di musica con l’iPhone.
Batteria ricaricabile
La batteria ricaricabile assicura 12 ore di ascolto. Se la batteria si esaurisce, è
comunque possibile ascoltare la musica in modalità passiva.
Funzioni (vA)
q Pulsante di accensione dell’illuminazione
Accende l’indicatore di illuminazione.
w Indicatore di illuminazione
Si illumina in rosso o in blu a seconda dello stato.
e Porta di ricarica (porta per il collegamento USB)
A questa porta è possibile collegare il cavo USB incluso per caricare la batteria
della cuffi a.
r Rotella di controllo
Consente di controllare i prodotti Apple che supportano il telecomando.
t Microfono per chiamate
y Pulsante di accensione
u Presa mini stereo
Connettore per il cavo audio incluso.
i Indicazione L/R
Preparazione della cuffi a
Ricarica della batteria (vB)
Per caricare la batteria della cuffi a al primo uso dopo l’acquisto oppure quando il
livello della batteria è basso, collegare la cuffi a a un computer utilizzando il cavo
USB incluso.
L’indicatore di illuminazione sulla sinistra lampeggia durante la ricarica della
batteria.
• Livello di carica da 0% a 49%: luce lampeggiante rossa lenta.
• Livello di carica da 50% a 99%: luce lampeggiante rossa ogni due secondi.
• Livello di carica 100%: l’indicatore di illuminazione sulla sinistra si spegne.
• Quando il livello della batteria è basso, l’indicatore di illuminazione sulla sinistra
lampeggia in rosso ogni tre secondi.
• Se completamente carica, la batteria garantisce circa 12 ore di riproduzione
audio a volume normale.
• Durante la ricarica della batteria è comunque possibile riprodurre audio ed
effettuare telefonate. In tal caso, a seconda del computer in uso, è possibile
che l’audio della cuffi a sia disturbato.
NOTA
• Se la batteria si esaurisce durante l’uso, l’amplifi catore e l’illuminazione a LED sulla
cuffi a si spengono ma è comunque possibile ascoltare musica in modalità passiva.
• La durata della batteria può variare a seconda della temperatura dell’ambiente di
utilizzo, del metodo di utilizzo e così via.
• Se la batteria si esaurisce facilmente anche se è stata completamente ricaricata,
è possibile che sia necessario sostituirla. In tal caso, contattare il centro di
assistenza e manutenzione DENON.
• Non tentare di sostituire la batteria.
Collegamento della cuffi a al dispositivo audio (vC)
Utilizzare il cavo audio incluso per collegare la presa mini stereo della cuffi a alla
porta cuffi a del dispositivo audio.
NOTA
Collegare innanzitutto il cavo audio incluso alla presa mini stereo della cuffi a.
Utilizzare la presa adattatore da 1/4” placcata in oro (inclusa), se richiesto per la
porta cuffi a del dispositivo audio.
Regolazione della cuffi a (vD)
Verifi care le marcature sinistra/destra sulle cuffi e, quindi sistemare quella
contrassegnata con la lettera “L” sull’orecchio sinistro e quella contrassegnata
con la lettera “R” sull’orecchio destro.
Regolare la lunghezza del cursore di scorrimento per adattarlo alla testa quando
si indossa la cuffi a.
NOTA
• Leggere il documento allegato “Precauzioni sull’uso della cuffi a”.
• Prestare attenzione a evitare che le dita o altre parti del corpo rimangano
incastrate nelle parti in movimento del prodotto.
• Non tirare i cursori con forza eccessiva.
Uso della cuffi a
Accensione della cuffi a (vE)
All’accensione della cuffi a viene attivato l’amplifi catore equalizzatore incorporato,
che consente di ottenere una riproduzione audio ancor più potente.
Spostare il pulsante di accensione in direzione della freccia.
• La cuffi a si accende.
Spegnimento della cuffi a
Spostare il pulsante di accensione nella direzione opposta rispetto alla freccia.
• La cuffi a si spegne. È comunque possibile ascoltare la musica in modalità
passiva.
Le funzioni di riproduzione audio e di controllo dei prodotti Apple sono disponibile
anche quando la cuffi a è spenta.
nAccensione dell’indicatore di illuminazione (vF)
È possibile accendere/spegnere l’illuminazione o cambiare la luminosità.
Accensione/spegnimento dell'illuminazione a LED dalla rotella
di controllo
Premere il pulsante di accensione illuminazione sulla cuffi a sinistra.
• L’indicatore viene acceso/spento ogni volta che si preme il pulsante.
Regolazione della luminosità dell'illuminazione a LED dalla
rotella di controllo
Premere e tenere premuto il pulsante di accensione illuminazione sulla cuffi a
sinistra.
• La luminosità cambia mentre si tiene premuto il pulsante.
• È possibile scegliere tra quattro livelli di luminosità. Rilasciare il pulsante di
accensione illuminazione quando si ottiene la luminosità desiderata.
Uso dei prodotti Apple (vG)
Quando si collega la cuffi a al prodotto Apple utilizzando il cavo audio incluso, è
possibile utilizzare la rotella di controllo sulla cuffi a destra per eseguire operazioni
di riproduzione e regolare il volume.
NOTA
• È possibile utilizzare la cuffi a per controllare il funzionamento dei soli prodotti
Apple e non di altri dispositivi.
• Il cavo audio incluso è compatibile con la funzione di controllo dei prodotti
Apple. La funzione di controllo dei prodotti Apple potrebbe non essere
disponibile quando si usa un cavo diverso.
• Utilizzare la versione più recente del software Apple.
• Tutte le operazioni sono conformi al telecomando originale Apple.
• È possibile utilizzare il telecomando e il microfono della cuffi a per iPod
nano (quarta generazione o successiva), iPod classic (120/160 GB),
iPod touch (seconda generazione o successiva), iPhone 3GS e successiva, e
iPad.
• È inoltre possibile utilizzare il telecomando della cuffi a per iPod shuffl e (terza
generazione o successiva).
• La riproduzione audio è disponibile per tutti i modelli di iPod.
nRiproduzione (vH)
Premere una sola volta la rotella di controllo.
• Premere più volte per alternare tra riproduzione e pausa.
nSalto di una traccia (vH)
Passaggio alla traccia successiva
Premere due volte rapidamente la rotella di controllo
Passaggio all'inizio della traccia corrente o alla traccia
precedente
Premere tre volte rapidamente la rotella di controllo.
nAvanzamento rapido/riavvolgimento (vH)
Avanzamento rapido
Premere una volta rapidamente la rotella di controllo e tenerla premuta.
Riavvolgimento
Premere due volte rapidamente la rotella di controllo e tenerla premuta.
nRegolazione del volume (vH)
Ruotare la rotella di controllo in senso orario o antiorario.
nVisualizzazione del nome della traccia e dell’artista della
traccia corrente (funzione Voice Over) (
vH)
Premere e tenere premuta la rotella di controllo per almeno due secondi.
Uso della cuffi a per telefonare
Con la cuffi a accesa è possibile effettuare telefonate. La voce dell’interlocutore
viene riprodotta tramite la cuffi a mentre l’utente parla attraverso il microfono
incorporato della cuffi a.
Effettuare una chiamata
Comporre il numero utilizzando il telefono cellulare.
Quando si effettua una telefonata, la riproduzione audio viene sospesa
temporaneamente fi no al termine della chiamata.
Rispondere a una chiamata in arrivo (vH)
In caso di chiamata in arrivo la riproduzione della musica viene interrotta e si sente
uno squillo in cuffi a.
Premere una sola volta la rotella di controllo.
• In questo modo è possibile rispondere e avviare la chiamata.
Terminare una chiamata (vH)
Premere una sola volta la rotella di controllo.
• In questo modo la chiamata viene terminata e la riproduzione della musica
riprende automaticamente.
Uso della funzione di avviso di chiamata
Utilizzare uno dei metodi seguenti per accettare una chiamata in arrivo mentre è
già in corso un’altra chiamata.
nTerminare la chiamata corrente e accettare quella nuova
(
vH)
Premere e tenere premuta la rotella di controllo per almeno due secondi.
nMettere in attesa la chiamata corrente e accettare la nuova
chiamata/passare alla chiamata in attesa (
vH)
Premere la rotella di controllo.
Rifi utare una chiamata in arrivo (vH)
Quando viene rilevata una chiamata in arrivo, premere e tenere
premuta la rotella di controllo per almeno due secondi.
Ruotare la rotella di controllo per regolare il livello del volume della voce
dell’interlocutore.
Ulteriori informazioni
Specifi che del prodotto
Tipo di driver Tipo dinamico
Dimensione driver Ø 50 mm
Sensibilità 108 dB/mW (se alimentata)
Impedenza in ingresso
64 Ω (se alimentata)
Frequenza di riproduzione Da 5 a 37.000 Hz
Durata riproduzione
continua
Circa 12 ore
Temperatura di esercizio Da 5 ˚C a 40 ˚C
Alimentazione
Batteria ai polimeri di litio ricaricabile incorporata
da 3,7 V CC
Peso 310 g
Primeros pasos
Gracias por adquirir los auriculares Denon Urban Raver™. Lea atentamente este
manual así como la documentación de la “Quick Guide” y las “Precautions on the
use of headphones” adjuntas primero para utilizar los auriculares adecuadamente.
Accesorios
q Guía de referencia rápida ............................................................................... 1
w Precauciones durante el uso de los auriculares ............................................ 1
e Cable de audio (longitud: aprox. 1,3 m)......................................................... 1
r Cable USB (para cargar, longitud: aprox. 1,3 m) ........................................... 1
t Clavija del adaptador ...................................................................................... 1
y Estuche .......................................................................................................... 1
Funciones
Auriculares con un amplifi cador de alta potencia integrado
El amplifi cador de alta potencia que funciona con una pila incluida en los
auriculares proporciona una gran potencia al controlador grande de 50 mm de
diámetro para obtener unos graves ricos y potentes durante la reproducción.
Almohadillas que emplean espuma con memoria de forma pentagonal
patentada de Denon
Almohadillas que se adaptan con fl exibilidad a la forma natural de sus oídos al
tiempo que los cubren completamente para lograr una adaptación perfecta y
una experiencia de audio de alta fi delidad.
La rueda de control pendiente de patente de Denon permite controlar la
reproducción de dispositivos Apple
®
Rueda de control ubicada en la almohadilla derecha para facilitar el control
del funcionamiento de la reproducción y del volumen del Apple iPod/iPhone/
iPad. La rueda de control izquierda controla la iluminación del anillo LED azul
alrededor de ambas ruedas de control para ofrecer un aspecto de gran efecto
(activar o desactivar/brillo).
Compatibilidad con llamada de manos libres
La llamada de manos libres es posible con los auriculares activados cuando se
recibe una llamada mientras se escucha el iPhone.
Pila recargable
La pila recargable proporciona 12 horas de placentera escucha. Cuando la pila se
agota, puede seguir escuchando música en modo pasivo.
Funciones (vA)
q Botón de iluminación
Activa el indicador de iluminación.
w Indicador de iluminación
Se ilumina en color rojo o azul en función del estado.
e Puerto de carga (puerto de conexión USB)
Conectado al cable USB incluido para cargar la pila de los auriculares.
r Rueda de control
Controla los productos Apple con la ayuda del mando a distancia.
t Micrófono de llamada
y Interruptor de potencia
u Mini conector estéreo
Conector para el cable de audio incluido.
i Indicación L/R
Preparación de los auriculares
Carga de la batería (vB)
Cargue la pila de los auriculares cuando los use por primera vez tras la compra o
cuando la pila se esté agotando conectando los auriculares a un ordenador con
el cable USB incluido.
El indicador de iluminación de la izquierda destellará cuando la pila se esté
cargando.
• Carga entre el 0% y el 49%: destella lentamente en rojo.
• Carga entre el 50% y el 99%: destella en rojo cada 2 segundos.
• Carga al 100%: el indicador de iluminación de la izquierda se apaga.
• Si el nivel de la pila es bajo, el indicador de iluminación de la izquierda destellará
en rojo cada 3 segundos.
• Si está completamente cargada, la pila proporciona aproximadamente 12 horas
de tiempo de reproducción de audio a un volumen normal.
• Se puede reproducir audio y es posible realizar llamadas mientras la pila se está
cargando. En tal caso, en función del ordenador que se utilice, puede que se
mezcle algún ruido de interferencia con los auriculares.
NOTA
• Si la pila se agota durante el uso, el amplifi cador y la iluminación LED de los
auriculares se desactivarán, pero podrá seguir escuchando música en modo
pasivo.
• El tiempo de uso puede variar en función de la temperatura del entorno de uso,
el método de empleo, etc.
• Si el tiempo de uso es extremadamente corto aunque la pila esté completamente
cargada, es posible que esta se acerque al fi nal de su vida útil. En ese caso,
póngase en contacto con el centro de servicio DENON.
• No intente sustituir la pila.
Conexión de los auriculares al dispositivo de audio (vC)
Utilice el cable de audio incluido para conectar el mini conector estéreo en los
auriculares y el puerto de los auriculares en su dispositivo de audio.
NOTA
Primero conecte el cable de audio incluido en el mini conector estéreo de los
auriculares.
Utilice un conector adaptador chapado en oro de 1/4” (incluido) si el puerto de los
auriculares de su dispositivo de audio precisa ese tamaño.
Ajuste de los auriculares (vD)
Compruebe las marcas de posición y coloque “L” en el oído izquierdo y “R” en
el oído derecho.
Ajuste la longitud del deslizador para adaptarlo a su cabeza cuando lleve puestos
los auriculares.
NOTA
• Lea la documentación “Precautions on the use of headphones” adjunta.
• Evite que sus dedos u otras partes del cuerpo queden atrapados en las partes
móviles del producto.
• No tire con fuerza de los deslizadores.
Uso de los auriculares
Conexión de los auriculares (vE)
Al encender los auriculares se activa el amplifi cador ecualizador integrado, lo que
permite disfrutar de una potente reproducción de audio.
Mueva el interruptor de potencia en la dirección de la fl echa.
• Los auriculares están encendidos.
Apagado de los auriculares
Mueva el interruptor de potencia en dirección opuesta a la fl echa.
• Los auriculares están apagados. Puede continuar escuchando música en modo
pasivo.
La reproducción de audio y el control del producto Apple están disponibles aunque se
haya desconectado la alimentación de los auriculares.
nActivación/desactivación del indicador de iluminación
(vF)
Puede activar/desactivar o cambiar el brillo de la iluminación.
Activación/desactivación de la iluminación LED en la rueda de
control
Pulse el botón de iluminación en el auricular izquierdo.
• El indicador se activa/desactiva cada vez que pulsa el botón.
Ajuste del brillo de la iluminación LED en la rueda de control
Mantenga pulsado el botón de iluminación en el auricular izquierdo.
• El brillo cambia mientras el botón está pulsado.
• Puede elegir entre cuatro niveles de brillo. Libere el botón de iluminación en
el brillo deseado.
Control de productos Apple (vG)
Con los auriculares conectados a su producto Apple con el cable de audio
incluido, puede utilizar la rueda de control del auricular derecho para realizar
operaciones de reproducción y para ajustar el volumen.
NOTA
• Los auriculares no pueden controlar dispositivos que no sean productos Apple.
• El cable de audio incluido es un cable compatible con el control del producto
Apple. Es posible que el control del producto Apple no esté disponible si se
utiliza un cable distinto.
• Utilice el software de Apple más reciente.
• Todas las operaciones son compatibles con el mando a distancia original de
Apple.
• Puede utilizar el mando a distancia y el micrófono de los auriculares para el iPod
nano (cuarta generación y posteriores), iPod classic (120/160 GB), iPod touch
(segunda generación y posteriores), iPhone 3GS y posterior, y iPad.
• También puede utilizar el mando a distancia de los auriculares para el iPod
shuffl e (tercera generación y posteriores).
• La reproducción de audio está disponible para todos los modelos de iPod.
nReproducción (vH)
Pulse la rueda de control una vez.
• Cada pulsación alterna entre la reproducción y la pausa.
nSalto de una pista (vH)
Salto a la pista siguiente
Pulse la rueda de control dos veces rápidamente.
Salto al inicio de la pista actual o a la pista anterior
Pulse la rueda de control tres veces rápidamente.
nAvance/retroceso rápido (vH)
Avance rápido
Pulse la rueda de control una vez rápidamente y manténgala pulsada.
Retroceso rápido
Pulse la rueda de control dos veces rápidamente y manténgala pulsada.
nAjuste del volumen (vH)
Gire la rueda de control en el sentido de las agujas del reloj o en sentido
contrario.
nConsulta del nombre de la pista y del nombre del artista de la
pista actual (función de voz superpuesta)
(vH)
Mantenga pulsada la rueda de control durante dos segundos o más.
Realización de llamadas telefónicas
Puede realizar llamadas telefónicas con los auriculares puestos. La voz del
interlocutor proviene de los auriculares mientras que su voz se registra en el
micrófono integrado de los auriculares.
Realizar una llamada
Marque el número de teléfono utilizando el teléfono móvil.
Cuando realice una llamada, la reproducción de audio se pondrá en pausa
temporalmente hasta que la llamada fi nalice.
Responder a una llamada (vH)
Cuando se detecte una llamada entrante, la música se pondrá en pausa y
escuchará el tono de llamada a través de los auriculares.
Pulse la rueda de control una vez.
• Esta operación permite responder e iniciar la llamada.
Finalizar una llamada (vH)
Pulse la rueda de control una vez.
• Esta operación permite fi nalizar la llamada; la reproducción de la música que
estaba escuchando se reanudará automáticamente.
Usar la función de llamada en espera
Utilice cualquiera de los métodos siguientes para responder a una llamada
entrante con una llamada en curso.
nFinalice la llamada actual y responda a la nueva llamada
(vH)
Mantenga pulsada la rueda de control durante dos segundos o más.
nPonga la llamada actual en espera y responda a la nueva
llamada/cambie a la llamada en espera (
vH)
Pulse la rueda de control.
Ignorar una llamada entrante (vH)
Cuando se detecte una llamada entrante, mantenga pulsada la rueda de
control durante dos segundos o más.
Gire la rueda de control para ajustar el nivel del volumen de la voz del interlocutor.
Información adicional
Especifi caciones del producto
Tipo de controlador Tipo dinámico
Tamaño del controlador Ø 50 mm
Sensibilidad 108 dB/mW (con alimentación)
Impedancia de entrada
64 Ω (con alimentación)
Frecuencia de reproducción 5 a 37.000 Hz
Tiempo de reproducción
continua
Aprox. 12 horas
Temperatura de
funcionamiento
5 °C a 40 °C
Alimentación eléctrica
Pila de polímero de litio recargable integrada
de 3,7 V CC
Peso 310 g
e
r
t
y
A
w
r
q
e
i
t
u
y
w
B
C
D
When turned on /
Eingeschaltet /
Lorsqu’il est allumé /
All’accensione /
Cuando está encendido
Red marker /
Rote Markierung /
Marque rouge /
Indicatore rosso /
Marcador rojo
E
Illumination switch button /
Beleuchtungsschalter /
Interrupteur témoin lumineux /
Pulsante di accensione
dell’illuminazione /
Botón de iluminación
F
G
Control wheel /
Steuerrad /
Molette /
Rotella di controllo /
Rueda de control
H
AH-D401E2_1116.indd 1 2012/11/19 19:56:05


 (2 pages)
 Manymanuals.com
 Manymanuals.de
 Manymanuals.fr
 Manymanuals.it
 Manymanuals.pl
 Manymanuals.cz
 Manymanuals.es
 Manymanuals-pt.com
Comments to this Manuals