Denon AVR-3806 User Manual Page 83
- Page / 142
- Table of contents
- TROUBLESHOOTING
- BOOKMARKS
- AVR-3806 1
- SAFETY INSTRUCTIONS 2
- Getting Started 4
- 2 System setup menu 5
- “SERIAL NO 6
- Accessories 7
- Before using 7
- Cautions on handling 8
- Cautions on installation 8
- Inserting the batteries 8
- Part names and functions 9
- Front panel 9
- Remote control unit 10
- Rear panel 10
- Easy Setup and Operation 11
- 2 Connections 12
- Speaker connections 12
- 2 Speaker impedance 12
- Protector circuit 12
- Note on speaker impedance 12
- DVD player 13
- Auto Setup / Room EQ 14
- POWER switch 15
- Connecting Other Sources 19
- The video conversion function 20
- Connecting a TV tuner 21
- Connecting a DBS tuner 22
- Connecting a DVD recorder 23
- Connecting a VCR 23
- Connecting a tape deck 24
- Connecting a CD player 24
- Connecting a turntable 24
- DENON LINK connections 25
- Interface) terminals 25
- 2 Copyright Protection System 25
- 2 AM loop antenna assembly 27
- Connecting the XM terminal 28
- Basic Operation 31
- STANDARD button 32
- ROOM EQ button 32
- (Main unit) 33
- (Remote control unit) 33
- ON SCREEN button 34
- STATUS button 34
- DIMMER button 34
- INPUT MODE button 34
- Surround 36
- Playing modes for different 36
- PURE DIRECT DIRECT/STEREO 37
- STEREODIRECT 37
- DIRECT/STEREO 37
- PURE DIRECT 37
- SURROUND 38
- PARAMETER 38
- Offset -4dB 39
- Dial.Norm 39
- 2 Surround parameters q 40
- STANDARD 41
- IIx and Pro LogicII Mode: 42
- DTS NEO:6DOLBY PLIIx 43
- DENON original surround modes 44
- 2 Personal memory plus 44
- 7CH STEREO 45
- DSP SIMULATION CURSOR 45
- TONE DEFEAT 46
- TUNER button on 48
- Channel Category 51
- Artist name/Song title 51
- Channel name 51
- Channel number 51
- Advanced Operation 52
- MODE SELECTOR button for the 54
- SETUP button for at least 54
- NUMBER to 54
- 9, 7, 5 button (9 57
- SYSTEM CALL 58
- MODE SELECTOR 58
- Lighting time 59
- 2, 6, 7, 8, 9 or 3) 59
- IR segment 60
- MAIN ZONE 7.1-channel system 61
- MAIN ZONE 5.1-channel systems 62
- ZONE 2 ZONE 3 62
- ZONE2/3/REC SERECT 63
- FUNCTION 63
- FUNCTION POWER SURROUND MODE 64
- NIGHT PURE DIRECT 64
- RECOUT SOURCE 65
- DVD 65
- Advanced Setup – Part 1 66
- [ On screen display ] 67
- IIx cinema) 75
- Advanced Setup – Part 2 80
- OFF Audyssey 85
- FlatManual 85
- 1. Auto Setup/Room EQ 87
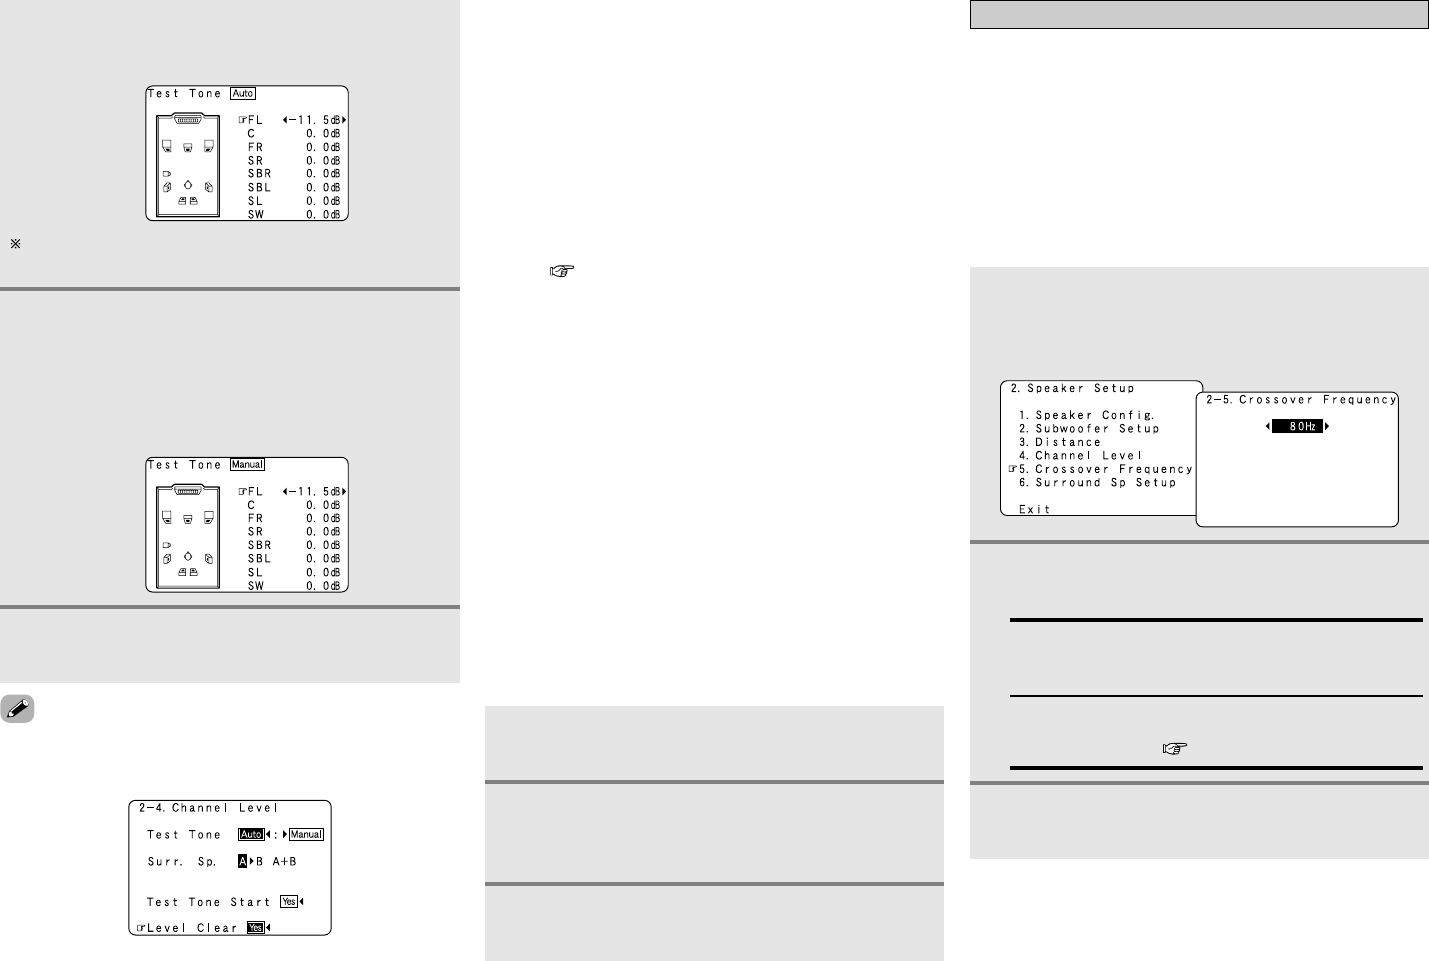
- 2. Speaker Setup 87
- 3. Audio Input Setup 88
- 5. Advanced Playback 89
- 6. Option Setup 89
- Troubleshooting 90
- PageMeasuresCauseSymptom 91
- Additional Information 92
- Speaker setting examples 93
- Surround back 94
- [2] DTS Digital Surround 96
- [3]DTS-ES 96
- 2 DTS-ES™ Discrete 6.1 96
- 2 DTS-ES™ Matrix 6.1 96
- Audyssey MultEQ XT 97
- Surround modes and parameters 99
- II/IIx MUSIC MODE only 100
- IIx CINEMA 102
- IIx MUSIC 102
- Specifications 105
- 10087, 10565 115
- SATELLITE 129
- TV/DVD Combination 138
- TV/VCR Combination 138
- TV/VCR/DVD Combination 138
- CABLE/PVR Combination 138
- DBS/PVR Combination 139
- TOKYO, JAPAN 142
Related products and manuals for Acoustics Denon AVR-3806
 (2 pages)
(32 pages)
(2 pages)
(2 pages)
(32 pages)
 (56 pages)
(2 pages)
(72 pages)
(2 pages)
(2 pages)
(110 pages)
(2 pages)
(56 pages)
(2 pages)
(72 pages)
(2 pages)
(2 pages)
(110 pages)
(2 pages)
 (73 pages)
(2 pages)
(2 pages)
(128 pages)
(1 pages)
(2 pages)
(112 pages)
(2 pages)
(4 pages)
(73 pages)
(2 pages)
(2 pages)
(128 pages)
(1 pages)
(2 pages)
(112 pages)
(2 pages)
(4 pages)
© 2020, manymanuals.com. All rights reserved. | 1.887 s |
 Manymanuals.com
 Manymanuals.de
 Manymanuals.fr
 Manymanuals.it
 Manymanuals.pl
 Manymanuals.cz
 Manymanuals.es
 Manymanuals-pt.com
Comments to this Manuals